Vincent Trouser Notes
Seam allowance
Use whatever your pattern has. Vince's draft assumes 1/4"SA
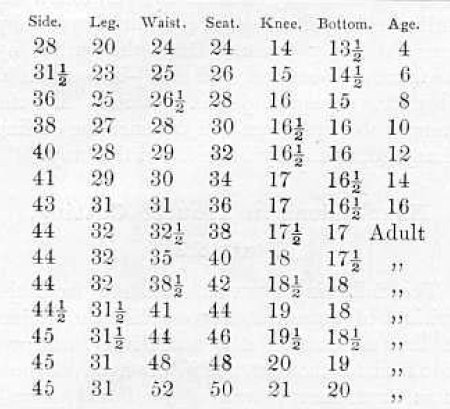
Standard knee proportions
Use with care. Modern men are different in size and proportion to historic ones, and our knowledge of measuring is also better. Shared particularly for the information on knee and hem widths:
The legs are shaped for the fashion in a couple of ways - by using the right measurements at knee and hem, and by using the iron. However, you also add some shaping at the outline drawing stage.
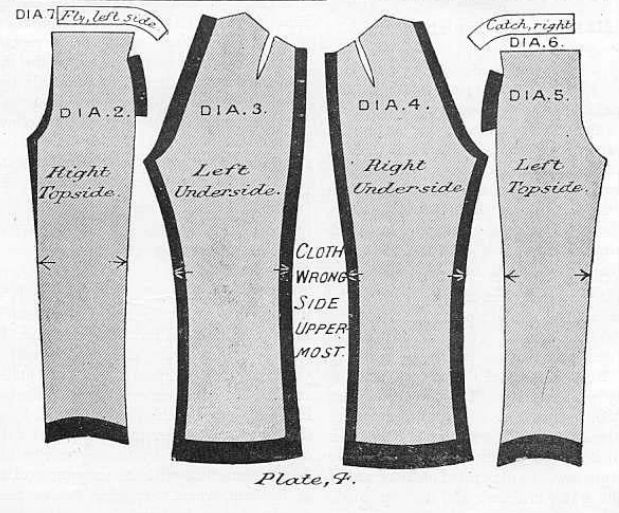
Top: Inside leg(knee to hem) straight as possible. Side seam (knee to hem) hollowed (connect the points with a straight line, and then shave off a curve inside).
Under:Inside leg - sprung out at the bottom, and a little more curve given to the top - but not too hollow. Side seam (knee to hem) hollowed (same as top)
Vincey boy doesn't give a nice picture of this, but you can sort of judge the idea from this:
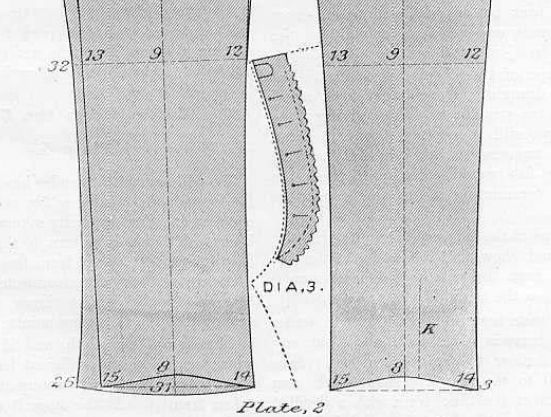
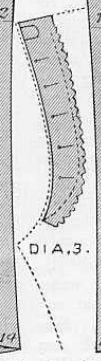
That extra sprung-out can be seen on diagrams, such as this one, helping pull the back of the leg forward (but note this diagram also shows the trousers after you have done the ironwork)
Given the importance of leg shaping to style, V's lack of precision here is maddening. I've been through his full draft a couple of times, and tl;dr he mis-places the center line so that the crotch is too tight and the side seam is flappy. So, using it won't give that much more help.
Butt darts
Vincent refers to this as a "fish", not a dart. Its widest point is on the waistband, curving inwards after that point both above and below; and it should be curved - not straight. It should be ~3" from the sideseam, and pointing backwards. Don't cut it out - sew it, but leave the rest of the dart fabric "there".
Button placement
|
On the back, the position of the back brace button (C) should never be more than 2" from the back seam; for the braces which are made require the buttons to be 3 1/2" apart. That's Vincent's take, anyway; is this still true? Get your braces ahead of time, and check the width, then ensure your pattern reflects it precicely On the front, find halfway along the waistband and then find 1/2" closer to the CF. That's the position of the first button. The second is 3 1/2" away from the center point of the waistband, closer to the side seam. They are placed on the right side of the fabric. But, again, get your braces first and ensure the spacing is correct for you. On the left, the layout for the fly and the catch. |
And if you are marking a side pocket onto the pattern, it is 6" high from the waistline downwards (not the top hem of the garment, but that line under the waistband). You can also add a back welt or flap pocket; Vincent thinks a flap is best. The front of the pocket should be 3.5" down from the tp and the back 4.5" from top. THey should not be too deep or will be uncomfy when wearer seated.
Inlays
Inlays are extra fabric left for adjusting the fit of the trousers. They're not the same as seam allowance.
- 1" - 1 1/2" - at the hem of the trouser legs
- On the topside of the trousers, there are no inlays - except sometimes the pocket facing is left on the cloth; or it can be attached later. The bit removed on the Right Topside is for the dress.
- 1" - side seam (outer leg)
- 1/2" -3/4" - leg seam (inner leg)
- 1" - seat seam
Trouser pieces have the pointy sticking out crotch pieces, which are quite wasteful of fabric when you're cutting out. So they are routinely cut separately, then sewn onto the rest of the trouser piece, to avoid wasteful layouts
Inlay is generally not put onto the pattern pieces, but instead chalked onto the cloth at cutting out time.
Cutting out

|
A possible cutting layout: fold the cloth and cut two!
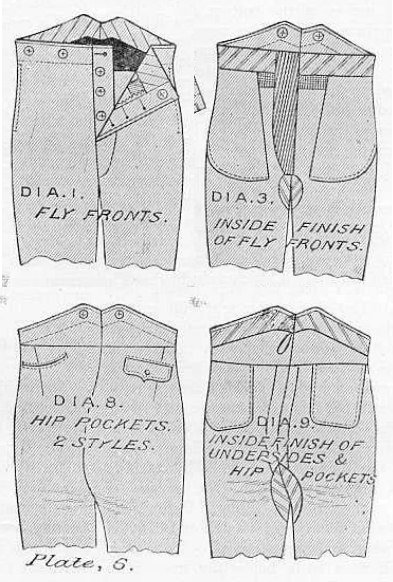
Notice, reluctantly, that Vincent truly does not cut a separate waistband here - it's all one piece of cloth! There's some places on his diagrams which seem to be a waistband line, but I guess it's topstitching/where the waist lining is attached! The fly and catch are cut separate here, but they can also be grown-on (i.e. cut in one piece with the rest of the trouserlegs) |
You will need!
It seems to me that cutting these to size as you go is the best bet!
| 8 | canvas | 3-4" | ? unsure |
| 9 | pocketing | 13" | Cut one for each side pocket bag |
| 10 | silesia | 9" | I believe this is a lining fabric. JMC says late trousers might use silk, silesia, cotton sateen (striped) for lining. There's a crotch lining, two fly linings, the square and the lumpy shape are like linings around the seat. |
| 11 | linen | 6" | a stiff, canvas like fabric - use French canvas - rather than what you might think of as linen. An interfacing. Crotch stay, hip stay, and? |
| 12 | striped silesia | 3-4" | waist lining - cut on the bias |
| 15 | Silk and a length of galloon | rather more than the waist length | "for top binding". silk thread for topstitching? is galloon like bias binding? |
Also:
- Buttons: 7 large & 5 small (5 for the fly. 7 for??? there are six visible on the waistband, so perhaps the 7th is at the CF) (bone or ivory better than metal)
- Twist (for buttonholes)
- Thread, machine silk, basting cotton etc as required
JMC also uses stay tape here and there.
What are these pieces for?
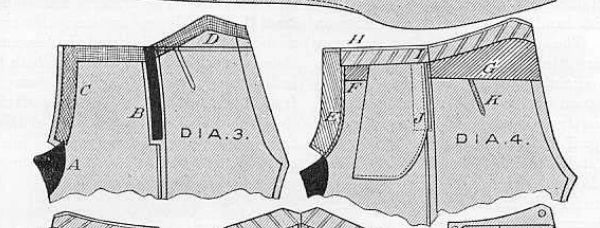
Dia 3 - A and B are made of Linen. It's a crotch stay, and? something to do with the pocket
Dia 4 - E, F, G are silesia. That's an inner to the fly or catch; idk what F is; G is the "blind", again idk. I wonder if its function is like, basically an interlining to keep grot off the outer fabric and give us something to sew things to. You can see F and G (black inside the trousers) in the Fall Front illustration
Dia 4 - H is the top binding, either binding made for this purpose, Italian cloth, or silesia to match. Is this like bias binding?
Dia 4 - I is the waist band, being cut by preference on the bias. Looks like it's the "waist lining" in striped silesia!
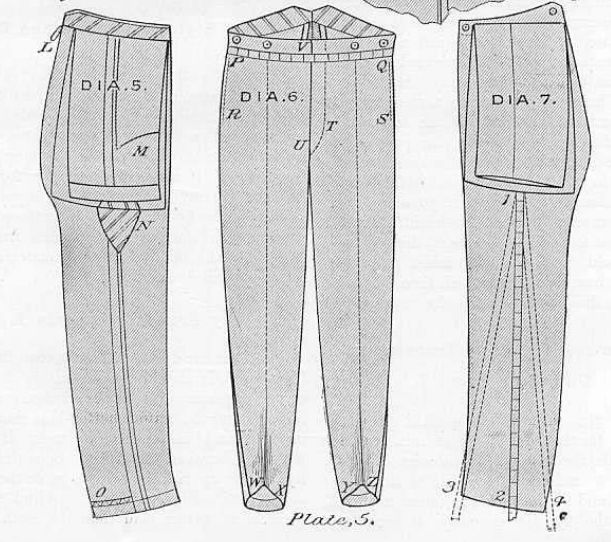
You can also get an idea of what the bits are for from his diagrams of the trousers inside and out:
|
In the first diagram, that black patch at the back is clearly G, and the little grey square near the fly is F. G is not coloured on the inside-back diagram (9) but you can see its outline. |
To shrink or not to shrink?
You can ironwork the trouser pieces before or after the trousers are assembled. My modern book opts for before; Vincent recommends after.
Ironwork is tailor magic - what makes tailored trousers look better than shop bought - and it's purely amatter of practice, confidence and experience. Cabrera's Classical Tailoring Techniques (newest edition) has some photos. When you make (real) wool wet, and then apply a hot iron, you can strech the fabric into shapes and curves and extra fllness, or shrink it away as if if it had vanished, shaping and sculpting the fabric. Be aware tho, that the wool can singe or mark if you're not careful.
Two diagrams here: Dia 1 is if you're doing before you sew; Dia 2 if afterwards
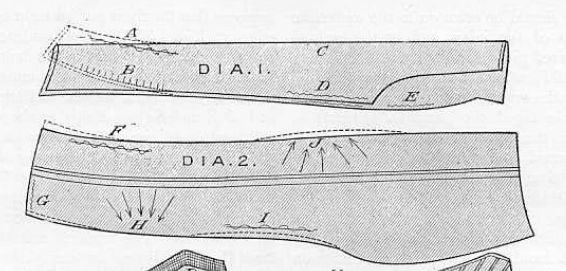
Vincent says: take a good wide board. Lay the trousers on it as shown in the diagram. Wet with a spoge or damp cloth, form into a curve at F, and then with a good sharp iron work away the fullness at F. Then flip over the garment and repeat so that both sides get equal shrinking
Then repeat:
- Curve at F - shrink
- a slight round at the top of thigh J
- a little hollow at I
- a little round over calf H
- a little hollow over instep below H
- A curving inwards at bottom, G